Developing Predictive Analytics Solutions Using Agile Techniques

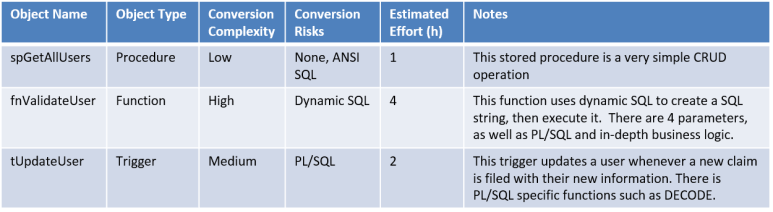
There is a lot of confusion around the traditional software life-cycle vs a data science life-cycle. Are they completely different animals? They both leverage technology that solves business problems, so we should be able to use similar techniques, right?  Well, yes and no. Let’s discuss.

Half of predictive analytics projects started by companies fail “because they aren’t completed within budget or on schedule, or because they fail to deliver the features and benefits that are optimistically agreed on at their outset.” [[1]]  This story is very familiar in the software development world. [[2]] Agile techniques, complemented by Development Operations (DevOps) methodologies, were developed to address some of the key challenges is bringing software projects to completion. In this post, I address one way to adapt these techniques for use in a data analytics project. [[3]]

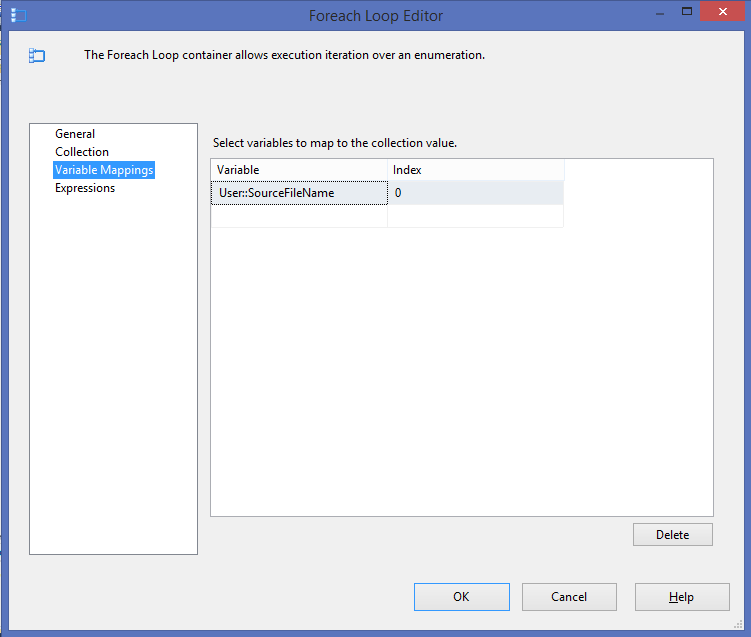
CRISP-DM Methodology

The current standard [[4]] methodology for data science projects is the Cross Industry Standard Process for Data Mining (CRISP-DM) (illustrated in the circular diagram) [[5]]. It captures the iterative nature of doing data science. Similar to traditional BI, data science is iterative by nature.

CRISP-DM_Process_Diagram[[6]]

The challenge with CRISP-DM is getting actionable results from the data science project – turning it into business processes and getting results out to decision makers. There are several potential traps in the methodology that can lead to project failure:

  • Getting stuck in the Data Understanding-Data Preparation phase – Large data can be overwhelming and lead to the team getting lost in trying to match the business use cases with the available data.
  • Getting stuck in the data preparation-modeling loop This potentially can be an infinite loop without sufficient controls and focus for breaking out of the loop. There is no such thing as a perfect model, but it is hard to determine when the model is “good enough”
  • Getting out of the main business understanding to evaluation loop Data analytics projects can iterate many times over this entire loop and never break out into deployment.

A great way to avoid these traps is to combine the CRISP-DM methodology [[7]] with result-driven Agile methodology, with the integrated techniques from DevOps/DataOps [[8]].

Agile Methodology

Adapt the Agile Scrum Framework [[9]] to the needs of a data analytics project [5] by mapping the roles and events onto the CRISP-DM methodology. The resources involved in the Scrum Framework are illustrated below and can be heavily leveraged with the CRISP-DM methodology as well.

Agile Scrum Framework at a Glance[[10]]

The Scrum Team

The Product Owner

From the Scrum Guide:

The Product Owner is responsible for maximizing the value of the product and the work of the Development Team. How this is done may vary widely across organizations, Scrum Teams, and individuals. [9]

For a predictive analytics project, this is either the data science project sponsor or a member of the organizational leadership team. Having a product owner helps to provide clear guidance and direction to the data science team and keep the project focused on real business needs.

The Data Science Team

Typically called the “development team” in Agile guides and recently modified to be a DevOps team, the data science team includes everyone who is working on the data science project. From [9]:

The Development Team consists of professionals who do the work of delivering a potentially releasable Increment of “Done” product at the end of each Sprint. Only members of the Development Team create the Increment.

Likewise, a data science (or DataOps) team consists of members with complementary skills [[11]] including:

  • Data engineers who are responsible for capturing, storing, and processing data;
  • Data scientists who work on the data cleaning and predictive modeling;
  • Business analysts who connect an understanding of the business with data understanding;
  • Platform administrators who work with the data engineers and data scientists to develop deployable products; and,
  • UX designers who work on the front-end data communication with the data product users.

The Scrum Master

A Scrum Master acts as the data science team guide and interface between the data science team, the product owner, and the organization.

Scrum Events

The Scrum methodology breaks up the overall project into smaller pieces of work known as sprints with the goal of producing a potentially usable product at the end of each sprint.

The heart of Scrum is a Sprint, a time-box of one month or less during which a “Done”, useable, and potentially releasable product Increment is created. Sprints best have consistent durations throughout a development effort. A new Sprint starts immediately after the conclusion of the previous Sprint. [9]

The iterative nature of the CRISP-DM doesn’t fall nicely into the more linearly-focused Agile Sprint. However, mapping key components of CRISP-DM onto Agile Sprints helps keep focus on creating usable business products at the end of each sprint.

First Sprint

The goal of the first sprint is to reach a point where the team understands the business objectives and organizational data. From the CRISP-DM method:

The first stage of the CRISP-DM process is to understand what you want to accomplish from a business perspective. Your organization may have competing objectives and constraints that must be properly balanced. The goal of this stage of the process is to uncover important factors that could influence the outcome of the project. Neglecting this step can mean that a great deal of effort is put into producing the right answers to the wrong questions. [5]

Furthermore, the sprint should gather an initial collection of data sources including the tools required for data loading. [5]

This sprint is considered “Done” when the team presents a report describing the key business issues, an inventory of available data assets, a plan for answering the top business data questions, and a description of what success will look like.

Second Sprint

To front-load the entire data process, combine several of the CRISP-DM stages into a single sprint with the goal of delivering a minimally viable predictive product at the end of the sprint. The combined CRISP-DM stages are

  1. Data Preparation: perform data cleaning, enrichment, and feature engineering steps
  2. Modelling: select and assess modeling techniques, tune model parameters
  3. Evaluation: evaluate model performance against the business goals

This sprint is “done” when the team either has a model that performs at an acceptable level, or has determined that the data are not sufficient to meet the business goals. In the case of an acceptable model, the goal of the sprint is to have the initial model ready for further testing and deployment into a production environment. When the data are not sufficient to meet the business goals, the sprint produces a report documenting the evidence for this outcome.

Third Sprint

In the case where the test model developed in the second sprint is meeting business goals, the goal of the third sprint is to get the model into production.

In the deployment stage you’ll take your evaluation results and determine a strategy for their deployment. If a general procedure has been identified to create the relevant model(s), this procedure is documented here for later deployment. It makes sense to consider the ways and means of deployment during the business understanding phase as well, because deployment is absolutely crucial to the success of the project. This is where predictive analytics really helps to improve the operational side of your business. [5]

The sprint is considered “done” when the team deploys a functional predictive analytics model in the production environment. At this point, the predictive analytics model can start to generate value for the business.

In the event where the second sprint finds that the business goal cannot be met with existing data, a third (and successive) sprint starts back at the beginning, selecting another business goal for evaluation or selecting a different set of data to work with.

Conclusion

Adopting this combination of Agile and CRISP-DM methodologies creates a framework for moving predictive analytics projects into the production environment where they can have a positive impact on the business. It helps teams break out of potential infinite loop traps and keep them focused on the overall goal: providing a positive return on investment for the business.

[1] http://analytics-magazine.org/the-data-economy-why-do-so-many-analytics-projects-fail/, https://www.analyticsvidhya.com/blog/2016/05/8-reasons-analytics-machine-learning-models-fail-deployed/

[2] http://www.mckinsey.com/business-functions/digital-mckinsey/our-insights/delivering-large-scale-it-projects-on-time-on-budget-and-on-value

[3] Other posts that also look at the Agile/Data analytics mash-up: http://www.kdnuggets.com/2017/04/librarian-scientist-alchemist-engineer-dataops.html, https://www.svds.com/tbt-successful-data-teams-are-agile-and-cross-functional/

[4] http://www.kdnuggets.com/2014/10/crisp-dm-top-methodology-analytics-data-mining-data-science-projects.html

[5] http://www.sv-europe.com/crisp-dm-methodology/

[6] https://en.wikipedia.org/wiki/Cross_Industry_Standard_Process_for_Data_Mining

[7] http://www.kdnuggets.com/2017/02/real-world-results-agile-data-science-teams.html

[8] https://www.tamr.com/from-devops-to-dataops-by-andy-palmer/, ttps://en.wikipedia.org/wiki/Dataops

[9] https://www.scrumguides.org/scrum-guide.html

[10] http://agileforall.com/resources/introduction-to-agile/

[11] http://www.datasciencecentral.com/profiles/blogs/what-roles-do-you-need-in-your-data-science-team, http://www.kdnuggets.com/2015/08/3-components-successful-data-science-team.html

Advertisement

Mobile Reporting for a Mobile World – SSRS 2016 and Mobile Reports

With SQL Server 2016, as most of us are aware, there are numerous features that bring some amazing functionality to end users and really strive to complete the end-to-end user experience.  Microsoft has improved all key areas of the BI stack over the last decade by leaps and bounds up through SQL Server 2014…..with the exception of SSRS. Yes, there have been improvements, but they’ve been minor. In my humble yet honest opinion, Microsoft has fallen short of meeting customer expectations in this area. Their visualizations were incomplete, the user experience was a bit clunky, and performance was never terribly great.

There were constant hurdles to overcome when using SSRS. Personally, I would snapshot everything, cache as much as possible, automate delivery during off-hours and do my best to have SSRS display reports and do nothing more because performance seemed sub-part.  All of my stored procedures would do all of the heavy lifting on the database side, and the majority of my “report development” time would be spent on the data architecture piece. SSRS would simply render and display the data.

Fast forward to February 4, 2014…..the day Satya Nadella was appointed CEO of Microsoft and the exact day that Microsoft began the path toward data and cloud leadership. He has done more for this company than imaginable and brought it from the brink of obscurity to the industry(ies) leader.  He has accepted the shortcomings that the product stack has had and began planning to overcome each and every one of them.

Microsoft knew that the user community wasn’t terribly fond of SSRS, licensing was clear evidence of this. Tableau was the recognized market leader with their flashy visualizations and that “shiny new object” appeal. Rather than trying to build in-house with personnel that may not have had the creativity nor vision, they went after a company that clearly illustrated visualization leadership, Datazen.

What came next was a combination of the great visualizations of mobile reports (and still including their paginated reports) with the one piece of SSRS that was stable and highly respected, the security layer.

The Business Case for SSRS 2016 and Mobile Reports

So the obvious question here is, “Well I already have SSRS, why do I need this?” Or “I already have Tableau, Cognos, or some other reporting platform. Why would I want to switch to this?”

So for me, the above image makes one, and possibly the most important [particularly among leadership], aspect crystal clear…..consumability….the ability to consume reports on ANY devices ranging from your PC to your tablet to your mobile phone, all of which have a level of control allowing you to maximize your screen real estate.

Capabilities

Business insights through rich visualizations on any device. Native apps for Windows, iOS and Android

Benefits

  • Access your data from anywhere
  • Touch optimized data exploration and perfect scaling to any screen form-factor
  • Collaborate with colleagues on the go

Innovations

  • Acquisition of Datazen
  • Datazen Migration Assistant (for those that currently ues Datazen)
  • New Web Portal
  • Branding
  • Updated Report Builder
  • Mobile Report Publisher
  • Higher DPI
  • Printing (no ActiveX)
  • HTML 5
  • Visual Studio 2015

With all of this stated, it’s important to understand…..

Mobile Reports vs Traditional (Paginated) SSRS Reports

SSRS 2016 Overview

Now that we have a decent understanding of the inception of SSRS 2016, as well as what mobile reporting is, let’s dive into what SSRS 2016 IS and how Microsoft came to the conclusions they did by looking at the roadmap below. As we can see, the yellow circled items reflect SSRS 2016, but there’s an entire ecosystem of business intelligence that includes Power  BI, mobile apps, Excel, etc.

Mobile - BI Landscape.JPG

SSRS 2016 also includes the following improvements:

  • HTML 5 Rendering Engine
  • Cross browser compliant (Edge, Explorer, Firefox, Safari, etc.)
  • PDF Replaces ActiveX for Remote Printing
  • No ActiveX controls required (security hole)
  • Modern paginated reports
  • New, modern styles for charts, gauges, maps and other visualizations
  • File Export
  • XML, CSV, PDF, MHTML, Excel, PowerPoint, TIFF and Word *(advanced features)
  • Custom Branding
  • Customize the web portal logo and colors by using a branding pack
  • KPIs
  • Create data-driven and contextual KPIs in the web portal, including the ability to drill-through to more detailed reports (mobile, paginated, etc.)
  • Favorites
  • Save your daily/favorite content, including KPIs, Mobile/Paginated Reports, and PBI Reports

SSRS Web Portal

Web Portal

One of the great improvements is the addition of the “Web Portal”. I generally change the URL to reflect this nomenclature as well so it becomes http://localhost/WebPortal/.  I don’t follow the traditional “reports” nomenclature because it’s so much more than that now. It’s a “one stop shop” for all of your reporting needs, from data sources to data sets, to KPIs to mobile reports, to paginated reports, to Power BI reports (to be discussed later), to any other file of your choosing (similar to SharePoint repository).

Branding

Similar to SharePoint and modifying the cascading style sheets (CSS), users can modify some of the basic items such as the logo, title, title colors, background colors, etc.

Mobile - Web Portal.JPG

A brand package for Reporting Services consists of three items and is packaged as a zip file, which must then be uploaded to SSRS in the Branding section of the Settings page.

Mobile - Branding Files

Favorites

Once at the Power BI Web Portal, users have the ability to add their “every day” items to their list of Favorites. This way, every time they log into the portal, their Favorites are displayed only. This helps to overcome the overbearing directory structure that is traditional seen in SSRS. Users don’t need to remember which items reside in which path, they simply need to “Star” it and it’s now on their home page at their convenience. There is still the ability to search for specific reports, but I would only use that when you are unsure of what you’re looking for.

Mobile - Favorite KPI

How to Create SSRS 2016 Mobile Reports

Before we discuss how to create SSRS 2016 Mobile Reports, let’s quickly review the evolution of the tools from SQL Server inception to current day.

Mobile - Reporting Tool Evolution

As we can see, some tools have come and gone, while one has remained relatively stable and that’s Visual Studio. This tool will still be the primary and recommended development tool for standard (paginated) SSRS reports. Assuming most have used this tool and written SSRS reports, we’re going to focus on SSRS 2016 Mobile Reports, and the new tool we use to create them.

Mobile - SSRS Tools

SQL Server Mobile Report Publisher

Install the Mobile Report Publisher tool to create mobile reports. Use this SQL Server Mobile Report Publisher link to download the tool.

This application requires .NET Framework 4.5 (or later) and Visual C++ Redistributable for Visual Studio 2012 (x86).

Mobile - SSRS Mobile Report Publisher.JPG

Once installation is complete, fire up the Mobile Report Publisher!

Mobile - SSRS Mobile Report Publisher Screen.JPG

You’ll immediately notice a completely different UI compared to both the classic Report Builder and Visual Studio. There are 6 basic settings you need to understand in order to create reports.

  • Layout (Navigators, Gauges, Charts)
  • Data (Add, Refresh, Export)
  • Report Settings
  • Preview
  • Grid Control
  • Layout Control

Before we dig into more detail, let’s decide which approach we want to take when creating our mobile report.

Design First

In the design-first approach, create a mobile report layout first without importing any data.  This is a good way to create a mobile report when unsure that the data is formatted correctly.  Without real data, gallery elements are automatically bound to generated simulated data, which can be exported and used as a template to describe the required data.

Data First

The data-first approach is to import all required data first, then design the mobile report and set data properties on the mobile report elements.  This has the advantage of being able to connect each element to real data when added to the layout.  When using a data-first approach, be sure that the real data is formatted correctly for use with Mobile Report Publisher.

My personal preference is the Data First approach. I like to understand how each and every role of user is going to interact with the data, at which level of granularity, etc. Then once that’s established, I create data sets at the lowest level first, then aggregate up so each and evern layer of reporting can be satisfied (detailed level [paginated], mobile report, KPI, etc.)

I feel that this process is akin to building a house. The foundation is your data architecture, the windows, curtains, doors, etc. are your reporting solution (final and decorative pieces), while your framing and walls are your data strategy which helps combine the two.

Mobile - Reporting Approach

Once you’ve selected your approach, create a data source and a data set with either the standard Report Builder or Visual Studio. This is a pain point I hope they fix soon, because as of now you cannot create a data source or dataset with the SQL Server Mobile Report Publisher.

Mobile - Available data sources.JPG

Proper Chart Types

Once you’ve created both the data source and data set, select the proper chart type. There is some overlap with the standard SSRS paginated report chart types, so select the one matching the type and granularity of data. The chart below should be helpful.

Mobile - Report Chart Types.JPG

Mobile Specific Chart Types

For chart types specific to the mobile reporting component of SSRS, reference the following chart to follow best practices and recommendations.

Mobile - Mobile Specific Charts

Number of Charts per Layout

Once you’ve decided which chart type to use, click and drag it to the grid. You can then resize, change the data source, add drill through actions, etc. from there. To maximize the user experience, be sure to configure each report size with a specific layout. Screen real estate is tricky. Too much is overpowering, while too little leaves something to be desired. Consider putting more report parts on the computer layout, with less on the tablet, and the fewest on the mobile. Prioritize according to chart importance and insight value to the anticipated audience.

Mobile - Select Display Type.png

Once this is all completed and your high level approach is completed, dig into the details with the Layout, Data and Settings tabs to specify the following information:

  • Title
  • Sub-Title
  • Number Format
  • Data Structure
  • Drill-through (URL and parameter)
  • Series
  • Aggregations (Sum, Avg, etc.)
  • Currency (USD, EU, etc.)
  • Date Information

We won’t dig into all of this, or specifics around mobile report development, as the intent of this was to demonstrate the overall value and capabilities of SSRS 2016 Mobile Reports.

One final thing to note is that there is an option to Preview the report similar to Report Builder and Visual Studio, so be sure to use that before you deploy (save) to the SSRS 2016 server.

SSRS 2016 and Power BI

Many people mistakenly think that SSRS 2016 and Power BI are the same thing, but in my opinion, they are completely different. The functionality, the licensing, etc. are all different. The only things they have in common are that they’re reporting solutions (geared to different audiences), and they play well with one another.

I’ll be posting another blog in the coming weeks comparing and contrasting the two, as well as possibly leveraging BOTH!

The current version (as of now is SP1) currently supports uploading Power BI files, but they function similarly to SharePoint and any other website. When the user clicks on the file in the download bar, your browser detects the MIME type and opens the associated thick client (if available), in this case Power BI Desktop. SSRS 2016 currently DOES NOT render Power BI reports. This means that each and every person that would like to use the Power BI files MUST have the Desktop application installed. There is a workaround where you can create a HTML page that has a iFrame embedded that you can get from the Power BI portal, but bear in mind this isn’t truly an on-premises solution. The report and data (usually) is still coming FROM the Power BI portal.

Mobile - PBI Download

However, with all of that said, the crowd has been clamoring for an on-premises solution for Power BI. Previously, Microsoft’s answer would be SSRS 2016…..and it looks like it still is.

SSRS 2016 Technical Preview

Currently in technical preview, Microsoft has answered the call and will support Power BI on-premises. SSRS 2016 Technical Preview can currently RENDER Power BI reports, not just store them.  Here are a few important points on the current state.

  • On-premises solution to Power BI Sites (Cloud)
  • Create reports with Power BI Desktop
  • Connect “live” to Analysis Services models – both Tabular and Multidimensional (cubes)
  • Visually explore data and create an interactive report
  • Save reports to SSRS 2016 Technical Preview
  • View and interact with the report in your web browser
  • Same version of Power BI Desktop

Mobile - SSRS Technical Preview

So it looks like this may be released with SQL Server 2016 SP2, which would be a great addition. It’s still a mystery as to which features will be supported and which will not. Things like the Natural Language, Quick Insights and dashboards probably will not, while a myriad of additional data sources and drill-throughs probably will. This is all speculation, but time will tell and there are exciting times ahead!

To see/hear the full Allegient webinar, be sure to check it out here!

SQL Server 2016 – Data Masking and Always Encrypted

data-masking-and-always-encrypted

Two brand new and very exciting security features of SQL Server 2016 are Dynamic Data Masking and Always Encrypted.

What Dynamic Data Masking Is

Dynamic data masking limits (DDM) sensitive data exposure by masking it to non-privileged users. It can be used to greatly simplify the design and coding of security in your application.The purpose of dynamic data masking is to limit exposure of sensitive data, preventing users who should not have access to the data from viewing it. Dynamic data masking does not aim to prevent database users from connecting directly to the database and running exhaustive queries that expose pieces of the sensitive data.
data-masking-image
In the example below, assume there are only two roles of users.  The first role is Sally in charge of fraud investigation.  The second role is John who is in customer service.  Sally requires access to all data to complete her job while John only needs a few elements and maybe the part of the customer’s email address to verify identity.  Both users query SQL Server for the customer information, but Sally is able to see the entire email address while John can only see certain parts of the email address.
customer_service_and_fraud

Benefits of Data Masking

What are the benefits of data masking?  What are some specific reasons it should be used?

benefits


Data Masking Does Data Masking Does NOT
  • Limit sensitive data exposure by masking it to non-privileged users
  • Minimally impact the application layer
  • Allow applications to mask sensitive data without modifying existing queries
  • Complement other SQL Server security features (auditing, encryption, row level security, etc.)
  • Prevent database users from connecting directly to the database and running exhaustive queries that expose pieces of the sensitive data


How Data Masking Works

  • On-the-fly obfuscation of data in query results
  • Policy-driven on the table and column
  • Multiple masking functions available for various sensitive data categories
  • Flexibility to define a set of privileged logins for un-masked data access
  • By default, database owner is unmasked


Data Masking Platform Options

Supported Platform
Yes SQL Server 2016
Yes Azure SQL Database (SQL DB)
No, but it will be supported in the future Azure SQL Data Warehouse (SQL DW)
No, but it will be supported in the future Analytics Platform System (APS)

SQL Server 2016 and Azure SQL DB are the only platforms currently supporting data masking.  Azure SQL DW will support this feature in the near future while APS will be supported with AU6.


Data Masking Formats

The key concern I had looking at data masking was whether it would support all formats that I may need.  The short answer is that I don’t feel that it does. I think they try to solve the flexibility issue with the partial function, but it isn’t very flexible.  I have hopes this will be expanded with future updates.  Below are the  data masking formats currently available.

Masking Types.png


Enabling Dynamic Data Masking

Azure SQL Database


To enable data masking in Azure SQL DB, use the Azure Portal.

sql_db_masking

  1. Open the database blade
  2. Select the ‘Dynamic data masking’ option
  3. Enter a list of users that will see the data masking in the ‘SQL users excluded from masking’ text box
  4. Select the desired masking column and click ‘ADD MASK’
  5. Select the masking field format
  6. Click Update
  7. Click Save


SQL Server 2016

To interact with data masking for SQL Server 2016, use the following syntaxes:

— Enable data masking on dbo.DimCustomer.EmailAddress
ALTER TABLE dbo.DimCustomer ALTER COLUMN EmailAddress
ADD MASKED WITH (FUNCTION = ‘partial(3,”XXXXXX”,4)’);

— Grant DataMaskingDemo permission to see the data
GRANT UNMASK TO DataMaskingDemo;

— Revoke DataMaskingDemo permission to see the data
REVOKE UNMASK TO DataMaskingDemo;

— Drop the data masking
ALTER TABLE dbo.DimCustomer
ALTER COLUMN EmailAddress DROP MASKED;


Dynamic Data Masking Limitations and Considerations

So this is all fine and dandy and seems like it may work alright, but let’s get to the meat and see what limitations there are.

  • Data Masking format disappears during a cast (or convert)
    CAST([EmailAddress] AS CHAR(10))
    Results in ‘XXXX’

In the example above, when converting a masked column to another string, all business value disappears and the column is completely masked.

  • Predicate logic can infer values
    WHERE [EmailAddress] = ‘jon24@adventure-works.com’
    Returns the correct row with the masked value

In the example above, although the column has applied data masking, remember that the data still resides unmasked in the database.  This means that predicate logic can be applied to infer masked values.

Another example would be John wanting to know Frank’s salary information.  The salary column is masked, but this value can be derived using <, >, etc.  Eventually John can pinpoint what Frank’s salary is.

The bottom line is that data masking is not the most secure option, so if data needs to be secure, there are other options such as Transparent Data Encryption and Row Level Security and Always Encrypted.

Speaking of which….


Always Encrypted

Always Encrypted is a data encryption technology that helps protect sensitive data at rest on the server, during movement between client and server, and while the data is in use, ensuring that sensitive data never appears as plaintext inside the database system.

After you encrypt data, only client applications or app servers that have access to the keys can access plaintext data.

The following illustration depicts the Always Encryption process.

always_encrypted_diagram

  1. A user tries to execute a SQL statement from an application
  2. The SSN is encrypted in the database, so it is re-routed to the Enhanced ADO.NET Library
  3. The SSN the user specified is then encrypted and sent onto SQL Server
  4. SQL Server creates a SQL statement from the request, plus the SSN replaced with the cipher value
  5. The database then filters all rows that DO NOT match the cipher value
  6. The data is re-routed through the Enhanced ADO.NET Library so the cipher value can be decrypted
  7. The result set is returned to the user with the decrypted value

There are 2 encryption types that can be selected, deterministic and random, each of which has different attributes and the business needs will determine which one.

Deterministic Encryption

  • Always generates the same encrypted value for any given plain text value
  • Allows grouping, filtering by equality, and joining tables based on encrypted values
  • Allows unauthorized users to guess information about encrypted values by examining patterns in the encrypted column
  • Must use a column collation with a binary2 sort order for character columns

Random

  • Encrypts data in a less predictable manner
  • Randomized encryption is more secure, but prevents equality searches, grouping, indexing, and joining on encrypted columns


Encryption Keys

Once the encryption type is chosen, keys will need to be created.  These will generally be created by a security and/or compliance officer.  These keys are what will be used to encrypt and decrypt the data. The only encryption standard currently available is AEAD_AES_256_CBC_HMAC_SHA_256. Here are some details on this standard.

Column Master Keys

  • Used to encrypt column encryption keys
  • Must be stored in a trusted key store
  • Information about column master keys, including their location, is stored in the database in system catalog views

Column Encryption Keys

  • Used to encrypt sensitive data stored in database columns
  • Can be encrypted using a single column encryption key
  • Encrypted values of column encryption keys are stored in the database in system catalog views
  • Store column encryption keys in a secure/trusted location for backup


Enabling Always Encrypted

Now that concepts are a little better understood, it’s time to actually implement our chosen security model.

 1.  Use SQL Server Management Studio 2016 (for both SQL Server 2016 and Azure SQL DB)  alwaysencryptedwizard1
 2.  Run the Always Encrypted wizard  AlwaysEncryptedWizard2.png
3.  Choose the table column to encrypt  alwaysencryptedwizard3
4.  Choose the Encryption Type
  • Deterministic
  • Randomized
 alwaysencryptedwizard4
5.  Create/Select Keys
  • Column Master Key (CMK)
  • Create a Column Encryption Key (CEK)
 alwaysencryptedwizard5
 Finally, the easy part

6.  Create an application that inserts, selects, and displays data from the encrypted columns

  • After Always Encrypted is initialized, utilize an application that performs inserts and selects on the encrypted columns
  • To successfully run the sample application, run it on the same computer where the Always Encrypted wizard is run
  • To run the application on another computer, you must deploy Always Encrypted certificates to the computer running the client app


Important Notes:
  • The application must use SqlParameter objects when passing plaintext data to the server with Always Encrypted columns
  • Passing literal values without using SqlParameter objects will result in an exception
 Web design infographic


Always Encrypted Considerations

Create the appropriate certificates

http://www.databasejournal.com/features/mssql/exploration-of-sql-server-2016-always-encrypted-part-1-2.html

Limitations and Technologies NOT Supported

  • Encrypted columns do not allow range-like operations such as ‘>, <‘ , ‘LIKE’, etc.
  • Passing encrypted values to functions, user-defined or otherwise, is not allowed
    (the database doesn’t have access to the unencrypted values)
  • Equality comparisons can only be performed on columns that use deterministic encryption
  • Indexes can only be applied to deterministic encryption columns
  • Need same column encryption key for columns that are joined
  • Constant expressions that refer to encrypted columns not allowed
    ex. WHERE SSN = ‘111-11-1111’, but WHERE SSN = @SSN is because the driver works with the SqlParameter class
  • Unsupported data types: xml, rowversion, image, ntext, text, sql_variant, hierarchyid, geography, geometry, and UDFs
  • Currently the only driver that supports this feature is .NET 4.6
  • This is NOT TDE
  • Encrypted columns take significantly more space
  • String-based columns that are encrypted with deterministic encryption must use a _BIN2 collation (e.g. Latin1_General_BIN2)
  • The following data types are NOT supported as encrypted columns, per the documentation:
    text/ntext/image
    XML/hierarchyid/geography/geometry
    alias types/user-defined data types
    SQL_VARIANT
    rowversion (timestamp)
  • Sparse columnset (sparse columns are okay, provided the table doesn’t contain a columnset)
  • Built-in alias types, e.g. SYSNAME
  • Identity columns
  • Computed columns
    Temporal tables
  • Triggers are partially supported
  • Full-text search
  • Replication (need more research)
  • In-Memory OLTP
  • Stretch Database

Whew, that’s a mouthful.  It’s clear that this is a new technology and a first iteration. Polybase has been around for years, Query Store is a newer version of Extended Events, etc.  So while some SQL Server 2016 technologies are relatively complete and stable, Always Encrypted still has some work to do.  The limitations will weigh heavily in your architectural approach.


Selecting the Right Technology……or Both?

Is Always Encrypted superior to data masking?  Should I should always choose this?

The short answer is that one provides a higher level of security over the other, BUT each business use case will dictate the technology chosen, which sometimes results in them being COMPLEMENTARY!

Combining deterministic encryption AND data masking allows for the highest FUNCTIONAL level of security for data warehouses and relational databases.

If both technologies are selected collectively, be sure to encrypt all columns FIRST, then add Dynamic Data Masking, otherwise:

AlwaysOnError.png

Now that 2 major security features of SQL Server 2016 have been discussed, next on the agenda will be Row Level Security (RLS) and Transparent Data Encryption (TDE).


SQL Saturday Dallas – SQL Server 2016 Overview Presentation

As promised, here is the presentation we discussed during lunch at SQL Saturday Dallas.  Thanks and I hope you all enjoyed it.  I did!

SQL Saturday Dallas – SQL Server 2016 Overview

SQL Server 2016 – PolyBase

PolyBase Header

One of my favorite features (admittedly, there are quite a few) of SQL Server 2016 is PolyBase.  It’s a fantastic piece of technology that allows users to near seamlessly tie relational and non-relational data.  This feature has been available for Analytics Platform System (APS) and SQL Data Warehouse (SQL DW) for some time, and fortunately, it has finally made its way to SQL Server, thanks to the SQL Server 2016 release.

What is PolyBase?

PolyBase is a technology that accesses and combines both non-relational and relational data, all from within SQL Server.

It allows you to run queries on external data in Hadoop or Azure blob storage. The queries are optimized to push computation to Hadoop.

PolyBase_1

As previously mentioned, PolyBase is currently utilized by:

  • SQL Server 2016
  • Azure SQL DW
  • Analytics Platform System (APS)

PolyBase_2

What does this mean? It means that there’s flexibility for an evolving road map, whether it’s on premise (scaling out with APS), or Azure (SQL DW and SQL DB [coming in the near future]). The players change, but the game stays the same. Granted, there are some exceptions, but they should all provide the same functionality soon.

What Can PolyBase Do?

Query data stored in Hadoop. Users are storing data in cost-effective distributed and scalable systems, such as Hadoop. PolyBase makes it easy to query the data by using T-SQL.

  • Query relational and non-relational data with T-SQL, which allows
    • New business insights across your data lake
    • Leveraging existing skill sets and BI tools
    • Faster time to insights and  simplified ETL process

PolyBase_4

In the example above, an insurance company could join member information from a data warehouse in SQL Server and join it to vehicle sensor data from Hadoop, creating real-time insurance quotes based on demographic information as well as driving habits.

Query data stored in Azure blob storage. Azure blob storage is a convenient place to store data for use by Azure services. PolyBase makes it easy to access the data by using T-SQL.

Integrate with BI tools. Use PolyBase with Microsoft’s business intelligence and analysis stack, or use any third party tools that is compatible with SQL Server.

Import data from Hadoop or Azure blob storage. Leverage the speed of Microsoft SQL’s columnstore technology and analysis capabilities by importing data from Hadoop or Azure blob storage into relational tables. There is no need for a separate ETL or import tool.

Export data to Hadoop or Azure blob storage. Archive data to Hadoop or Azure blob storage to achieve cost-effective storage and keep it online for easy access.

PolyBase Performance

Personally, one of my main concerns when I heard about this technology was performance. Surely there has to be a huge performance hit on SQL Server, right?  The answer is, only if you want/need it to be.  It depends on which system demands higher availability and less system impact.

Push computation to Hadoop

The query optimizer makes a cost-based decision to push computation to Hadoop when doing so will improve query performance. It uses statistics on external tables to make the cost-based decision. Pushing computation creates MapReduce jobs and leverages Hadoop’s distributed computational resources.  To improve SQL Server query performance, enable pushdown computation on SQL Server by copying the Yarn class path in Hadoop to the SQL Server configuration. Then force the compute to the Hadoop cluster.

Scale Compute Resources

To improve query performance, and similar to scaling out Hadoop to multiple compute nodes, you can use SQL Server PolyBase scale-out groups. This enables parallel data transfer between SQL Server instances and Hadoop nodes, and it adds compute resources for operating on the external data.  This allows the ability to scale out as compute requires.

PolyBase_5

Now that we know how it works at a high level and that we absolutely want to use it, let’s walk through the installation process.

PolyBase Requirements

An instance of SQL Server (64-bit).

  • Microsoft .NET Framework 4.5.
  • Oracle Java SE RunTime Environment (JRE) version 7.51 or higher (64-bit). Go to Java SE downloads. The installer will fail if JRE is not present. *
  • Minimum memory: 4GB
  • Minimum hard disk space: 2GB
  • TCP/IP connectivity must be enabled. (See Enable or Disable a Server Network Protocol.)
* I always chuckle when I see the Oracle JRE requirement as Microsoft and Oracle are direct competitors

An external data source, one of the following:

  • Hadoop clusterHortonworks HDP 1.3 on Linux/Windows Server
  • Hortonworks HDP 2.0 – 2.3 on Linux/Windows Server
  • Cloudera CDH 4.3 on Linux
  • Cloudera CDH 5.1 – 5.5 on Linux
  • Azure blob storage account
  • Azure Data Lake (Not yet, but most likely in the near future as it is HDFS “under the hood”)

PolyBase Configuration

At a high level, you must complete the following all through T-SQL:

  1. Install PolyBase
    a. PolyBase Data Movement Service
    b. PolyBase Engine
  2. Configure SQL Server and enable the option
  3. Configure Pushdown (Not Required)
  4. Scale Out (Not Required)
  5. Create Master Key and Scoped Credential
  6. Create external data source
  7. Create external file format
  8. Create external table

Enable PolyBase

First see if it is enabled.

SELECT SERVERPROPERTY (‘IsPolybaseInstalled’)

If not, enable it with the appropriate connection type. Remember to execute the RECONFIGURE command so it takes effect the next time the service is restarted.

— 5 denotes the connection type
EXEC sp_configure ‘hadoop connectivity’, 5;

RECONFIGURE;

The connection types are as follows:

Option 0: Disable Hadoop connectivity
Option 1: Hortonworks HDP 1.3 on Windows Server
Option 1: Azure blob storage (WASB[S])
Option 2: Hortonworks HDP 1.3 on Linux
Option 3: Cloudera CDH 4.3 on Linux
Option 4: Hortonworks HDP 2.0 on Windows Server
Option 4: Azure blob storage (WASB[S])
Option 5: Hortonworks HDP 2.0 on Linux
Option 6: Cloudera 5.1, 5.2, 5.3, 5.4, and 5.5 on Linux
Option 7: Hortonworks 2.1, 2.2, and 2.3 on Linux
Option 7: Hortonworks 2.1, 2.2, and 2.3 on Windows Server
Option 7: Azure blob storage (WASB[S])

* I’m not sure why there are multiple options for Azure Blob Storage (options 1, 4 & 7). Maybe someone can tell me?

Then restart:

  • SQL Server
  • PolyBase Data Movement Service
  • PolyBase Engine

PolyBase_6

Enable Pushdown

As previously mentioned, to improve query performance, enable pushdown computation to a Hadoop cluster:

1. Find the file yarn-site.xml in the installation path of SQL Server. Typically, the path is:

C:\Program Files\Microsoft SQL Server\MSSQL13.MSSQLSERVER\MSSQL\Binn\Polybase\Hadoop\conf\

2. On the Hadoop machine, find the analogous file in the Hadoop configuration directory. In the file, find and copy the value of the configuration key yarn.application.classpath.

3. On the SQL Server machine, in the yarn.site.xml file, find the yarn.application.classpath property. Paste the value from the Hadoop machine into the value element.

Scale Out PolyBase

The PolyBase group feature allows you to create a cluster of SQL Server instances to process large data sets from external data sources in a scale-out fashion for better query performance.

  1. Install SQL Server with PolyBase on multiple machines.
  2. Select one SQL Server as head node.
  3. Add other instances as compute nodes by running sp_polybase_join_group.

— Enter head node details:
— head node machine name, head node dms control channel port, head node sql server name
EXEC sp_polybase_join_group ‘PQTH4A-CMP01’, 16450, ‘MSSQLSERVER’;

4. Restart the PolyBase Data Movement Service on the compute nodes.

Create Master Key and Scoped Credential

In previous versions of SQL Server 2016 (CTP through RC), this was done using a configuration file.  This is now in the much more friendly T-SQL context that most of us are familiar with.  This is enabled at the database level. If a master key has already been created, this step can be skipped, however it is required to encrypt the credential secret.

— Create a master key on the database.
CREATE MASTER KEY ENCRYPTION BY PASSWORD = ‘Pr@gm@t1cW0rk$’;

— IDENTITY: the user name
— SECRET: the password
CREATE DATABASE SCOPED CREDENTIAL HDPUser WITH IDENTITY = ‘hue’, Secret = ”;

Create the External Data Source

Provide and alias for your external data source and point it to your Hadoop cluster and port, using the scoped credential.  When architecting your Hadoop and SQL Server solution, remember that because the scope credential and external data source are at the database level, there can be multiple users, with multiple credentials with varying levels of access within Hadoop.  This can all be used collectively as a security model.

CREATE EXTERNAL DATA SOURCE [HDP2] WITH
(TYPE = HADOOP,
LOCATION = N’hdfs://pwpchadoop.cloudapp.net:8020′,
CREDENTIAL = HDPUser);

Create the External File Format

When creating the external file format, it’s important to specify the obvious settings of the format type and field delimiter, but equally important is the date format.  If the format does not match the source system, the conversion will fail and an error will occur when attempting to select the data from the Hadoop cluster.

CREATE EXTERNAL FILE FORMAT TSV WITH (
FORMAT_TYPE = DELIMITEDTEXT,
FORMAT_OPTIONS (
FIELD_TERMINATOR = ‘\t’,
DATE_FORMAT = ‘MM/dd/yyyy’))

Supported file types for external files are:

  • Delimited text
  • Hive RCFile
  • Hive ORC
  • Parquet

Reference https://msdn.microsoft.com/en-us/library/dn935026.aspx for additional details, particularly for the date format.

Create External Table

Last, but not least, create the external table.  The order and datatypes are critical.  If columns are specified in an order that does not match the Hadoop cluster, the implicit type cast may result in an error at best, or the wrong data in the wrong field at the worst.  The type casting from Hadoop to SQL Server is implicit, so if the SQL external table has an int, but the Hadoop cluster has a float, the cast will be successful, but precision will be lost.  Similarly, if an integer is specified, but the source is a string (ex. ‘FY2009’), an error will occur.  Match numbers to numbers (at the right precision), dates to dates, strings to strings, etc.

Specify the previously aliased datasource and file format, as well as the physical location of the file.  Similar to Hive, you may specify a directory with multiple files provided they all share the same structure and metadata.

CREATE EXTERNAL TABLE HDP_FactInternetSales
([ProductKey] [int],
[OrderDateKey] [int],
[DueDateKey] [int],
[ShipDateKey] [int],
[CustomerKey] [int],
…)

WITH
(LOCATION = ‘/apps/hive/warehouse/factinternetsales’,
DATA_SOURCE = HDP2,
FILE_FORMAT = TSV,
REJECT_TYPE = value,
REJECT_VALUE=0)

Using PolyBase

Now that everything’s all set up, it’s time to start playing around.

Insert to SQL Server from Hadoop

SELECT Insured_Customers.FirstName, Insured_Customers.LastName,
Insured_Customers.YearlyIncome, Insured_Customers.MaritalStatus
INTO Fast_Customers from Insured_Customers
INNER JOIN
(SELECT * FROM CarSensor_Data where Speed > 35) AS SensorD
ON Insured_Customers.CustomerKey = SensorD.CustomerKey

In the example above, the external CarSensor_Data table from Hadoop is being used as a filter to populate the SQL Server table Fast_Customers, where the external driving speed is greater than 35.

Insert to Hadoop from SQL Server

First, ensure that the setting is enabled on the server to export from PolyBase to the Hadoop cluster (and restart the service).

sp_configure ‘allow polybase export’, 1;
RECONFIGURE;

Then create the external data in Hadoop, specifying the file name and location, data source and file format.

CREATE EXTERNAL TABLE [dbo].[FastCustomers2009] (
[FirstName] char(25) NOT NULL,
[LastName] char(25) NOT NULL,
[YearlyIncome] float NULL,
[MaritalStatus] char(1) NOT NULL)
WITH   (LOCATION=’/old_data/2009/customerdata.tbl’,
DATA_SOURCE = HadoopHDP2,
FILE_FORMAT = TextFileFormat,
REJECT_TYPE = VALUE,
REJECT_VALUE = 0);

Once the table is created, the data can be pushed from SQL Server to Hadoop.

SELECT *
INTO [dbo].[FastCustomers2009]
FROM Fast_Customers

Ad-Hoc Queries

To force external compute down to the Hadoop cluster, or disable it, use the OPTION clause.

SELECT DISTINCT Insured_Customers.FirstName, Insured_Customers.LastName,      Insured_Customers.YearlyIncome, CarSensor_Data.Speed
FROM   Insured_Customers, CarSensor_Data
WHERE  Insured_Customers.CustomerKey = CarSensor_Data.CustomerKey and
CarSensor_Data.Speed > 35
ORDER BY CarSensor_Data.Speed DESC
OPTION (FORCE EXTERNALPUSHDOWN);
— or OPTION (DISABLE EXTERNALPUSHDOWN)

Pushdown

Use pushdown for selecting a subset of columns.

Use predicate pushdown to improve performance for a query that selects a subset of columns from an external table.  Predicate pushdowns will be the lease compute intense comparisons Hadoop can do.

In this query, SQL Server initiates a map-reduce job to pre-process the Hadoop delimited-text file so that only the data for the two columns, customer.name and customer.zip_code, will be copied to SQL Server.

SELECT customer.name, customer.zip_code
FROM customer
WHERE customer.account_balance < 200000


For example, the predicate in the where clause will be extremely fast because it is a predicate clause.

Also, use pushdown for basic expressions and operators.  SQL Server allows the following basic expressions and operators for predicate pushdown.

  • Binary comparison operators ( <, >, =, !=, <>, >=, <= ) for numeric, date, and time values
  • Arithmetic operators ( +, -, *, /, % )
  • Logical operators (AND, OR)
  • Unary operators (NOT, IS NULL, IS NOT NULL)

PolyBase Performance and Troubleshooting

PolyBase comes with a set of DMVs which come in extremely handy when performance issues or errors occur.  Reference https://msdn.microsoft.com/en-us/library/mt652314.aspx for the complete list, however the following are a great start.

Find the longest running query:

SELECT   execution_id, st.text, dr.total_elapsed_time
FROM   sys.dm_exec_distributed_requests  dr
cross apply sys.dm_exec_sql_text(sql_handle) st
ORDER BY total_elapsed_time DESC;

Find the longest running step of the distributed query plan:

SELECT   execution_id, step_index, operation_type, distribution_type,  location_type, status, total_elapsed_time, command
FROM   sys.dm_exec_distributed_request_steps
WHERE   execution_id = ‘QID4547’
ORDER BY total_elapsed_time DESC;

Find the execution progress of a SQL step:

SELECT execution_id, step_index, distribution_id, status,  total_elapsed_time, row_count, command
FROM sys.dm_exec_distributed_sql_requests
WHERE execution_id = ‘QID4547’ and step_index = 1;


Find the slowest part of the external compute step:

SELECT execution_id, step_index, dms_step_index, compute_node_id,  type, input_name, length, total_elapsed_time, status
FROM sys.dm_exec_external_work
WHERE execution_id = ‘QID4547’ and step_index = 7
ORDER BY total_elapsed_time DESC;

When all fails, dig in and take a look at the execution plan in SSMS.  It will provide more specifics, such as estimated degree of parallelism, etc.

PolyBase_7

Last but not Least, Have Fun and Play!

For the first time, SQL Server 2016 Developer is free to all users and comes with the exact same features as the enterprise version.  So any and all developers can install locally and have all features readily available to them.  Another free tool, SQL Server Data Tools for Visual Studio 2015, allow any and all developers to get up and running and have a little fun.


Hopefully this was helpful to some. I’m still learning a lot, particularly because this just went RTM a week ago and I was on vacation all last week, but this was a lot of fun to play with and I can’t wait to show everyone more features of the SQL Server 2016 stack.

Thanks to the community (David Benoit in particular) for adding additional content to this and always being helpful!

Take care!

Migrate from Oracle to SQL Server 2016

There is been plenty of activity and excitement recently concerning Microsoft’s aggressive move to obtain a large portion of Oracle’s market share.  There are always pros and cons to any situation, so I’m going to illustrate both, although as a Microsoft partner, we see more pros than cons.

We’re going to dive into five major questions that anyone considering migrating needs to answer specific to their own organizational culture and business needs.

  1. WHY move from Oracle to SQL Server 2016?
  2. How will it empower our business?
  3. What are the business, financial and migration impacts for us?
  4. How do we assess and mitigate risk when considering migration?
  5. What assistance is available to us to make this move?

So the biggest and obviously most important question here is, WHY should a company move away from Oracle to SQL Server 2016?

The fact is that Oracle requires a significant investment. Anyone that has adopted this technology also realizes the size of the footprint throughout their technology stack it probably has.  Nobody purchases Oracle licensing for small, or even medium businesses.  This is and has always been a very large scale solution.

Pragmatic Works has completed several conversions from Oracle to SQL Server, and the  thing we constantly hear is, “We have a lot of money, as well as processes, tied to this product. Why would we want to change?”

Let’s dive into that, but first let’s cover some Economics 101.  I received my undergraduate education in computer science, so when I began my MBA, most of these concepts were new to me.  The most important aspect of any technology investment is the Return on Investment, or ROI. EVERY single senior financial is going to complete this analysis and come up with some concrete numbers to justify the investment.  This is calculated as:

Gain from Investment – Cost of Investment
Cost of Investment

So if the gain from the investment exceeds the cost of the investment by a decent margin (why we divide by cost again), then it’s considered a solid investment, worth the time and money, and things move forward.

The Cost of Investment can be defined as the physical cost of the SQL Server hardware and software, plus the cost to migrate all objects to SQL Server. The physical cost is a clear, definable cost. The migration cost is highly variable and depends on the current implementation and will be discussed in further depth shortly (hint, Microsoft will help foot the bill).

So let’s dig into the costs we know.

SQL Server VS Oracle Cost

Comparing SQL Server Enterprise’s total price of $27,496 to Oracle’s $346,000 is a HUGE difference.  The reason is quite simple.  SQL Server 2016 is being labeled as “All Inclusive”, or just a buffet including steak, potatoes, drink, dessert, etc.  Oracle sells individual products “a la carte” which would be akin to ordering a steak, then ordering potatoes, then a drink, a dessert, etc.

Let’s look a little closer at those individual costs to make sure they add up to what is truly advertised.

  SQL Server Oracle Database
(All Options not Shown)
Enterprise Base License
(includes 1 year of support)

$27,496

$95,000

Data Available Included $11,500 (Active Data Guard)
(times 2 for 2 nodes)

$23,000 Total

Performance and Scale Included $11,500 (Advanced Compression)
$23,000 (Database In-Memory)
$11,500 (Partitioning)
$11,500 (Real Application Testing)
$7,500 (Diagnostics Pack)
$5,000 (Tuning Pack)

$140,000 Total

Enterprise Security Included
Free Download
$15,000 (Advanced Security)
$11,500 (Label Security)

$35,000 Total

Any Data, Built In Included $17,500 (Spatial & Graph)

$35,000 Total

Total Cost

$27,496

$346,000

What does this all mean?  Going back to Economics 101….


In economics and business decision-making, a sunk cost is a cost that has already been incurred and cannot be recovered. Sunk costs (also known as retrospective costs) are sometimes contrasted with prospective costs, which are future costs that may be incurred or changed if an action is taken.

For a great example on sunk costs, check out the U.S. Defense’s failed F-35 program.  It’s another way of saying, “Throwing good money after bad.”

The point here is that it doesn’t matter what has already been spent on Oracle licensing and infrastructure, it’s whether the technology satisfies the business in every aspect in the future, including financial, business, technical, etc.

In microeconomics, economies of scale are the cost advantages obtained due to size, output, or scale of operation, with cost per unit of output generally decreasing with increasing scale as fixed costs are spread out over more units of output.  So it’s the cost of the product decreasing as the quantity increases.

Economies of scope is an economic theory stating that the average total cost of production decreases as a result of increasing the number of different goods produced.  The concept here is that Microsoft is not investing all of their resources in just ONE product, they have the same resources contributing to several products, thus reducing the overall cost for the collective unit.  This all results in the following:

  • Extreme flexibility in product design and product mix
  • Rapid responses to changes in market demand, product design and mix, output rates, and equipment scheduling
  • Greater control, accuracy, and repeatability of processes
  • Reduced costs from less waste and lower training and changeover costs
  • More predictability (e.g., maintenance costs)
  • Less risk
  • ….and more

The Core of the Everything is, Am I Going to Get my Gain from Investment?

Yes, you will, by empowering the business through data.

Gain from the Investment by Providing for the Decision Makers

  • Robust Data Infrastructure
  • Powerful Integration
  • Analytics Tools
  • Free and Simple Access to Information
  • Intuitive Interface

Providing for Decision Makers

So There are Lots of Goodies, but Does the Technology Perform?

Yes, it does!  But don’t take it from me, let’s check out what the leading authority on technology assessment, and a completely non-biased company, Gartner Inc., says.

Breaking it down by subject, here’s what they say about Advanced Analytics Platforms and BI:

BI and Analytics Leader

How about database performance?  Does it perform?  Gotcha covered….

Database Leader

Okay, but at SOME point, you may want to move the cloud.  Gotcha covered….

Cloud Leader

  • Ask 10 Oracle DBAs the top reason to use Oracle and 9 times, you’ll hear “It has better security!”  Wrong….
  • The other 1 may say “It performs better”  Nope….
  • “What about this whole Mobile BI movement I hear so much about?”  Gotcha covered….

Secure Performing Mobile

  • Want to use R in-database?
  • In-memory across workloads?
  • Consistent experience from on-premise to cloud?

In-Database In-Memory Consistent

But wait, there’s more!!

SQL Server and Linux.png

Built on SQL Server 2016, SQL Server on Linux gives you the power to build and deploy intelligent applications on a single data management and business analytics platform. The preview is currently available to play around with, but the production version is slated for a mid-2017 release.

Migration Process

This process generally consists of the following 5 phases, not necessarily executed in order, sometimes reiterated , etc.

Analyze and Strategize

  • Project Road map
  • Validate ROI

Architect and Validate

  • Complete High Level Design
  • Justify Investment
  • Assess Migration Technical Issues

Complete Detailed Design

  • Implementation Plan
  • Create POC

Implement

  • Complete Implementation
  • Testing & UAT
  • Production Cut-over

Manage

  • Monitor Results
  • Optimize

Sometimes phases affect other phases and require re-work.  For example, if we began our detailed design but discover technology inadequacies, or the architecture cannot fully satisfy the business, the Architect and Validate step may need to be re-iterated.

Thankfully, there a couple of very helpful tools that can mitigate risk, as well as speed up the process.

Migration Tools

Microsoft Assessment and Planning (MAP) Toolkit for SQL Server

MAP

Using the MAP tool, get a complete network-wide inventory of SQL Server and Oracle instances, edition identification, and hardware assessment.

With MAP Toolkit, utilize the following reports:

  • Discovery and Inventory: Database inventory and reporting of Oracle instances on Windows and Linux based servers
  • Detailed Reporting: Covers specific SQL Server instances that include component name, version, edition, and more. Includes wide-ranging details of databases and server instances that can be used for consolidation. Oracle schema reporting identifies the size and use of each schema, estimates of the complexity of migration.
  • Hardware and platform details: Details for computers that are running heterogeneous database instances, including determining whether the machines are virtual or physical.

At the end of this process, you should have the capacity to do each of the following effectively:

  1. Scope for Server & Storage Consolidation, Migrations and Upgrade
  2. Utilize the Existing Infrastructure
  3. Streamline SQL Server Licensing
  4. Reduce Administrative Costs

SQL Server Migration Assistant (SSMA) for Oracle

SSMA

According to Microsoft, use the tool to “quickly convert Oracle database schemas to SQL Server schemas, upload the resulting schemas into SQL Server and migrate data from Oracle to SQL Server.”

According to me personally, use the tool to gather all metadata for all Oracle objects to perform deeper analysis.  Utilize Visual Studio for creating and maintaining databases and objects, as well as ETL development for data population.  Using formal development tools allows for a more iterative, reproducible, quantifiable and testable implementation.

Use SSMA for Oracle to Discover Objects

discover

The first 3 columns can be discovered by SSMA, however all Scheduler items must be manually discovered and assessed.

So we’ve found a list of all objects, now we just complete them all at the same time in a nice linear fashion, right?  Wrong!

Which of These Groups has the Highest Risk?

Programmability Risk

The highest risk item, BY FAR, is the programmability.  Creating every other object is a fraction of the time that re-writing programmable items will require.  I estimate that 75% or more of the object conversion effort will be converting programmability, and specifically PL/SQL.

This group include Packages, Stored Procedures, Functions and Triggers.

Fortunately, MOST programmable objects perform CRUD (Create, Read, Update and Delete) operations

  • If following ANSI SQL standards, platform independent syntax, they should be using COALESCE, CASE, JOIN, CAST, etc.
  • The majority of conversion work is when directly converting PL/SQL to T-SQL

Additional business logic embedded in the PL/SQL increases conversion time substantially, if not exponentially.

Complete In-Depth Programmability Assessment

Compile and detail a matrix consisting of the following items:

Programmability Assessment

This can also be modified to a working conversion document by adding columns such as ‘Converted to T-SQL’, ‘Unit Tested’, ‘UAT’, ‘Deployed’, notes for each column, etc.

This should be a deliverable that can be taken at the completion of the assessment and handed to any technology solution company (hopefully Pragmatic Works) for completion. The time and cost will have clear and defined boundaries.

Use ONE Tool to Kick off a Changeover Process, or “flip the switch”, on an Instance-by-Instance Basis

I prefer SSIS, because it does SEVERAL things very well (and I’m kinda good at it), AND it’s a Microsoft BI product.

  1. Execute Script Task (Create Objects)
  2. Data Flows (Migration of Data)
  3. Troubleshoot (Using Pragmatic Works’s BI xPress)
  • Execution Time (at any almost granularity)
  • Error Logging
  • Audit Framework
  • Troubleshooting
  • Notifications for Scheduled Migration Tests

Using SSIS, perform the following tasks programmatically in order (3 steps):
(Following Microsoft Data Warehouse Toolkit Recommendation)

Create (and drop) objects

  • Schemas
  • Tables
  • Synonyms, Sequences, Views

Populate Data

  • Enable Identity Insert
  • Cast/Convert
  • Lookup Whenever Necessary

Create Optimizations/Integrity

  • Partitions
  • Indexes
  • Relationships
  • Constraints

Migration Support

So how can we get a little bit of help with all of this?!  Who can help us?

Microsoft

Why our buddies at Microsoft can help us of course!

Easier than ever to switch – simplified migration tools, free training for Oracle DBAs, and starter deployment services help you break free of your current platform. Enjoy flexible deployment options for your applications whether maintaining on premise installations or optimize costs and adopt the cloud with Azure, the most trusted cloud in the industry.

….and let’s be honest about all of this, it isn’t free nor cheap.

Show me the money

And they have!  Microsoft has put their money where their mouth is and they’re offering to help out with this, not just with tools but financially.

Training and services are only available through June 30, 2016, but take advantage of:

  • Free SQL Server licenses (with Software Assurance)
  • Free training – SQL Server Essentials for the Oracle DBA
  • Subsidized deployment services to kick-start migration

Check out the Offer Datasheet for additional details.

We may or may not have convinced you to pick SQL Server 2016 over Oracle, but you have to admit that it’s a rather compelling argument and AT LEAST needs serious consideration.

The SQL Server 2016 Query Store

What is the Query Store?

A SQL Server 2016 (and SQL DB) Feature that can be Enabled

  • Provides insight on query plan choice and performance
  • Simplifies performance troubleshooting by quickly finding performance differences caused by query plan changes
  • Automatically captures a history of queries, plans, and runtime statistics, and retains these for review
  • Separates data by time windows to better illustrate database usage patterns and understand when query plan changes happened on the server

Why Use the Query Store?

Performance and Cost

Keeping performance high, and costs low

Table1

How the Query Store “Works”

How Query Store Works

  1. A SQL statement is executed
  2. The statement is compiled
    1. A compilation message is generated
  3. The statement is executed
    1. An execution message is generated
  4. Both messages are sent to the Query Store
    1. The Plan Store stores the execution plans
    2. The Runtime Stats are collected
    3. The Query Store Schema is updated with all information
      1. The Write-Back is asynchronous, which reduces latency

Does It Work with In-Memory OLTP?

In-Memory

  • SQL Server Query Store allows you to monitor the performance of natively compiled code for workloads running in-memory OLTP
  • Compile and runtime statistics are collected and exposed the same way as for disk-based workloads
  • When you migrate to in-memory OLTP you can continue using Query Store views in SQL Server Management Studio (SSMS) as well as custom scripts you have developed for disk-based workloads before migration
  • This saves your investment in learning Query Store technology and makes it generally usable for troubleshooting all type of workloads

How to Use the Query Store

In Just 3 Easy Steps, You TOO can be a DBA!!

Steps to Use Query Store

  1. Enable the Query Store
  2. Let the Query Store Collect the Data
  3. Pinpoint and fix “problematic” queries

Admittedly, the last step requires a bit more expertise and effort.

Setting up the Query Store

There are primarily 2 ways to accomplish this.

  1. Using the Query Store page in SSMS

In Object Explorer, right-click a database, and then click Properties

Setting up Query Store 1

In the Database Properties dialog box, select the Query Store page

Select related attributes

  • General
    • Operation Mode (Read or Read/Write)
  • Monitoring
    • Data Flush Interval (Manual Entry in Minutes)
    • Statistics Collection (5 mins, 10 mins, 15 mins, 30 mins, 1 hr, 1 day)
  • Max Size
    • Query Store Capture Mode (All or Auto)
    • Size Based Cleanup Mode (Off or Auto)
    • Stale Query Threshold (Manual Entry in Days)

Setting up Query Store 2

  1. By Using T-SQL Statements

Use the ALTER DATABASE statement
ALTER DATABASE AdventureWorksDW2016CTP3
SET QUERY_STORE = ON;

Setting up Query Store 3

Query Store Options with T-SQL

Query Store Options with TSQL

What Information Does the Query Store Provide?

Everything in the following data model:

Query Store Data Model

Query Store Views

Query Store Best Practices

  • Information and performance are generally a give and take, but there ARE some best practices
  • Every single setting in the Query Store has associated costs and benefits
  • Treat Query Store performance tuning like an agile project with Sprints
    • Sprint 1 – Keep Operation Mode in READ/WRITE mode for information collection
      • This reduces write time, and subsequent overall database performance, for data collection as no reporting is occurring
    • Sprint 2 – Change Operation Mode to READ mode for analysis and actual performance tuning
      • This increases report performance because no writes are occurring. This also results in no “dirty reads” because of the asynchronous writes


  • Information and performance are generally a give and take, and it ultimately relies on each and every business and its processes
  • Flush the data at specific business case intervals.  For example, if performance of the DB seems to be poor around end of the month due financial reporting, consider using the Agile methodology to complete one iteration, then flush the data before the next iteration.
  • Keep the Max Size small enough to keep the reporting relatively snappy, however, keep enough data to capture all of the business needs
  • Keep an accurate Cleanup Policy as the business and reporting solution evolves
  • Collect statistics as frequently as possible to see exactly which execution plans are being executed.  If the statistics are not updated for some time, you may be looking at an old execution plan because the statistics have changed

Query Store Reporting

For Azure SQL DB

Azure Query Store Reporting

Quick Performance Insight

The top queries view opens and the top CPU consuming queries are listed

  • The top line shows overall DTU% for the database, while the bars show CPU% consumed by the selected queries during the selected interval
  • The bottom grid represents aggregated information for the visible queries
    • Average CPU per query during observable interval
    • Total duration per query
    • Total number of executions for a particular query

Query Performance Insight

Viewing Individual Query Details

On Premise Solution

Use SQL Server Management Studio (SSMS)

SSMS

Query Store Dashboards

Query Store Dashboards

Custom Views and SQL

Leverage the data model

Query Store Data Model

Query Store Administration with T-SQL

Utilize the Query Store stored procedures

Query Store Stored Procedures

Forcing Execution Plans

Old Way

Old Way

New Way

New Way

Error State

  • Remember to verify intermittently that the Query Store is still collecting data

SELECT actual_state_desc, desired_state_desc, current_storage_size_mb,                                          max_storage_size_mb, readonly_reason, interval_length_minutes,                                          stale_query_threshold_days, size_based_cleanup_mode_desc,                                          query_capture_mode_desc
FROM   sys.database_query_store_options;

If there is a difference between the actual_state_desc and desired_state_desc, this indicates that a change of operations mode occurred automatically.

The most common change is for the Query Store to silently switch to read-only mode. In extremely rarely circumstances, Query Store can end up in the ERROR state because of internal errors.

When the actual state is read-only, use the readonly_reason column to determine the root cause. Typically, the Query Store transitioned to read-only mode because the size quota was exceeded. In that case the readonly_reason is set to 65536.

How to Fix Error State


Fix Error State

Live Query Statistics

This is a new feature of SSMS 2016.  Even if your organization chooses not to upgrade to 2016, this is still an option with 2014 SP1.

This feature provides the ability to view the live execution plan of an active query. This live query plan provides real-time insights into the query execution process as the controls flow from one query plan operator to another. The live query plan displays the overall query progress and operator-level run-time execution statistics such as the number of rows produced, elapsed time, operator progress, etc. Because this data is available in real time without needing to wait for the query to complete, these execution statistics are extremely useful for debugging query performance issues.

Live Query Statistics

Using a Regular Expression as a File Filter in SSIS

Flat files are one of the most common, if not the most common, data source for SSIS consumption. One of the most frequent practices in SSIS is iterating over a folder containing multiple files and processing each one independently.  The most common implementation of this is by using the For Loop Container and specifying a file filter.  This begs the question, “Why would a regular expression ever be needed as a file filter?”

Consider the following use case.

‘Z:/Files’ is a directory on a shared drive containing several files that need to be processed. To accomplish this, simply use the For Loop Container.

Image1

In the Collection, select ‘Foreach File Enumerator’ as the Enumerator. In the Folder, specify ‘Z:\Files’ as the file path. Specify ‘*.csv’ as the file filter.  Finally, select ‘Fully qualified’ for the value of the variable.  This ‘Fully qualified’ option is the easiest way to process files.  This will populate the SourceFileName variable with the fully qualified path including the file name and extension, while ‘Name only’ will only have the file name without the extension, and ‘Name and extension’ will have the file name and extension without the path.

In the Variable Mapping, select a string variable that will contain the file name. In this case, it is the string variable, ‘User::SourceFileName’. Specify ‘0’ as the Index.

Image2

This completes the For Each Loop container. To process the file, insert a data flow within the container so the data flow executes for each file.

Image3

Continue to the data flow task and create a new destination connection, which is commonly a staging area. Next, create a new flat file connection. Continue by entering a sample file name and defining the columns and associated meta-data in the ‘Columns’ and ‘Advanced’ sections respectively.

Image4

After defining the flat file connection, right click on the ‘Flat File’ connection and use the ‘User::SourceFileName’ variable as the expression below.

Image5

Now, every time the container iterates over another file inside the folder, the ‘Flat File’ connection will change and process that specific file.  After creating the destination connection and mapping the source to the destination, the ‘DFT – Load Staging File’ data flow should be complete and look similar to the image below.

Image6

The package should now be complete. For illustrative purposes, this simplified package does not include logging, notifications, file archiving, or other miscellaneous best practices.

The completed package will processes all of the files in the specified directory with the specified file filter.  As more and more files collect in the folder, the package continues to process as normal.   However, consider the possibility that one day there are both monthly and daily files in the same directory, but there is a requirement for separate destinations.

Say for example, one file labeled ‘20151007AUTH9339’ includes daily transactions for October 7th, 2015 (‘20151007’), with a business alias attached of ‘AUTH’ (in this case referring to authorizations), and appended with a company code (9339) all within the file name.  Another file labeled ‘201510AUTH9339’ includes monthly transactions for October 2015 (‘201510’), contains the same business alias of ‘AUTH’ and the same company code all within the file name.  These files are similar, but the monthly file contains all transactions for the entire month.  For the sake of simplicity, assume that the meta-data for each is the same.  However, the customer wants all daily data in one table but all monthly data in another.  They then perform a reconciliation process between the monthly file and daily files to ensure all transactions are correct.

One possible way around this is to separate the files into two separate destinations by using the same file filter, but adding a Conditional Split.

Image7

For the sake of simplicity, use the length of the ‘User::SourceFileName’ variable.  Assume the company code length is static.  The daily file name may be ‘Z:/Files/20151007AUTH9339.csv’, which has a length of 29, while the monthly file name may be ‘Z:/Files/201510AUTH9339.csv’ which has a length of 27, so we split them accordingly.

Image8

Now when we run the package, each file will end up in its respective destination as expected.

This is all fine and dandy for the simplest of situations, but there were obviously some package modifications made to accommodate such a simple change. We have also made several assumptions about file name variance.  We assumed the company code would not change, when it most likely would.

Worst of all, the collection of files may expand to include quarterly or annual files.  The impact of any of these assumptions changing, results in a more complicated and extensive solution.  This solution needs more flexibility.

These groups of files are also interdependent and linear rather than parallel.  Each file is looped over and processed one at a time.  The optimal solution would be to process multiple groups of files at the same time.  These groups are NOT dependent, so we should process them in PARALLEL.  The technical requirement should be to process all monthly files in parallel with all daily files.  This reduces our load time by using multiple threads and additional parallelism.  This solution needs the capability of easily running multiple groups in parallel.

The solution is using a regular expression file filter and having multiple data flows.

The latter part of the solution is simple. Multiple data flows is easy, but how do we go about using a regular expression in a file filter?  There is some flexibility with the FileSpec attribute, which allows expressions to be entered.

Image9

However, this is still not adequate. This does not allow for enough flexibility for unlimited file types, formats, naming conventions, etc.

The best way to achieve this is using a script task with C# or Visual Basic, leveraging their innate regular expression functionality. Either is acceptable, but I prefer the more commonly used C# standard.

Create a file filter regular expression variable as a string, create another variable containing the file path for the source files, and finally, create an object variable that will contain all of the relevant file names.

Image10

Next, edit the script and replace the Main() function with the following:

public void Main()
{
 string dirPath = (string)Dts.Variables["User::SourceFilePath"].Value;
 string[] aryFiles = Directory.GetFiles(dirPath); 
 List<string> lstFiles = new List<string>();
 string fileFilterExpression = (string)Dts.Variables["User::FileFilterExpression"].Value;
 Regex filenameRegEx = new Regex(fileFilterExpression);
 foreach (string fileName in aryFiles)
 {
 Match match = filenameRegEx.Match(fileName);
 if (match.Success) lstFiles.Add(fileName);
 }
 Dts.Variables["User::objFileList"].Value = lstFiles.ToArray();
 Dts.TaskResult = (int)ScriptResults.Success;
}

Connect the script task to the loop container as a predecessor and alter the loop container to use a different type of iteration. Rather than using the ‘Foreach From File Enumerator’, use the ‘Foreach From Variable Enumerator’.  Set the Variable as ‘User::objFileList’. The Variable Mappings section will remain the same with the ‘User::SourceFileName’ Variable and the ‘0’ Index.

Image11

This is all that needs completed for one regular expression file filter. To run another group in parallel, start by duplicating the variables and alias them a bit more appropriately as follows:

Image12

Then copy and paste the script and data flow tasks, ensuring the object names are changed, the correct variables are used for each script component, and the data flow destinations are changed.

Image13

After completion, this should be a fully functional package that processes both daily and monthly files in parallel. There are no limitations to the file filtering, provided you know the regular expression syntax. I tend to use this Cheat Sheet reference, and sometimes a more advanced reference here.

#etl, #regular-expression, #ssis

And so it begins…

I recently began a brand new and exciting endeavor with a company called Pragmatic Works as a senior Consultant implementing Microsoft business intelligence solutions. To say the people here are talented is an understatement. I’ve never been around a more technically verse group of people in my career.  What’s even more amazing, is that despite the abundant brilliance, everyone is incredibly humble, helpful and personable. This is going to be by far the most enjoyable, and hopefully the final, chapter of my career.

With all of that said, I’ve got quite a bit of ground to make up.  The last set of technologies I was heavily involved in was the Microsoft SQL Server 2008 R2 stack. I’ve done some work in 2012, but my knowledge isn’t nearly deep enough. I also haven’t had exposure to 2014, and 2016 is coming down the pipes!  It’s a steep and daunting climb ahead, but I’m up for the challenge!

Fortunately, I have more than adequate support from the Pragmatic Works team. We are all encouraged and helped to achieve any objectives that both the employee and the company feel are beneficial.

One of my first objectives is to begin publishing blogs and articles pointing out some of the things I’ve learned over the years related to the Microsoft BI stack that may be of assistance to others. It may start out a bit bumpy, but I’m confident with some guidance from the Pragmatic Works team, some research, preparation, practice, and hard work that this will prove beneficial to both the BI community and myself.